• Court Position: 2-3 feet behind service box line, centered
• Heating: Turn on 10 min before training (target 45°C+)
• Frequency: 5-6 sec (beginner) → 3-4 sec (intermediate) → 1.8-3 sec (advanced)
• Modes: Fixed Spot → Vertical Cycle → Horizontal 3-Line → Random → Cross Fixed
• Spin Progression: Flat → Topspin 2 → Topspin 4 (backhand); Backspin 3 (drops)
Introduction: Why Solo Squash Training Setup Matters More Than You Think
Solo squash training is the fastest way to improve your game — but only if your machine is set up correctly. You bought a squash ball machine. You unpacked it, charged the battery, and turned it on. Then what?
Most players make the same mistake: they set the machine to “random” and start hitting. That’s not training — that’s cardio with a racket. Effective solo squash training requires deliberate setup, structured drills, and progressive overload.
After 9+ years in this industry (and 200+ hours testing the VEKEDA S336A), I’ve learned that proper setup determines 80% of your solo squash training results. The wrong settings reinforce bad habits. The right settings accelerate your improvement faster than months of casual play.
This guide walks you through exactly how to set up your machine for solo squash training — from court positioning to drill programming — using the VEKEDA S336A as the reference standard. If you are still in the buying phase, make sure to read our 2026 supplier verification guide to avoid common scams.
Part 1: Know Your Machine’s Capabilities for Solo Squash Training
Before setting anything up, understand what your machine can do. A successful solo squash training session depends on knowing your equipment inside out. Here’s the complete specification of a modern programmable squash ball feeding machine:
| Parameter | Specification |
|---|---|
| Ball Capacity | 80 balls |
| Power Supply | AC + DC 12V/32AH Lithium Battery |
| Max Power | 360W (±10%) |
| Feeding Frequency | 1.8 – 8.9 seconds/ball (±10%) |
| Ball Distance | >7 meters |
| Ball Height | >6 meters |
| Net Weight | 21 KG |
| Ball Type | Standard squash balls |
| Control Method | Available |
|---|---|
| APP Operation (iOS/Android) | ✅ Yes |
| Remote Control | ✅ Yes |
| OTA Remote Upgrade | ✅ Yes |
| Mode | Purpose for Solo Squash Training |
|---|---|
| Fixed Spot | Groove a specific shot |
| Vertical 2/3/5 Point Cycle | Front-back movement training |
| Top/Back Spin (6 levels each) | Realistic ball physics |
| Horizontal Narrow/Medium/Wide 2-Line | Lateral movement training |
| Horizontal 3-Line | Full court coverage |
| Horizontal/Full Court Random | Match simulation |
| Cross Fixed Modes (6 patterns) | Pattern recognition |
| Lob Shot | High ball practice |
| Deep/Shallow Ball | Depth variation |
Part 2: Court Setup for Effective Solo Squash Training
The Golden Position: Place your machine 2-3 feet behind the service box line, centered on the court. This creates the most realistic ball trajectory for your solo squash training session.
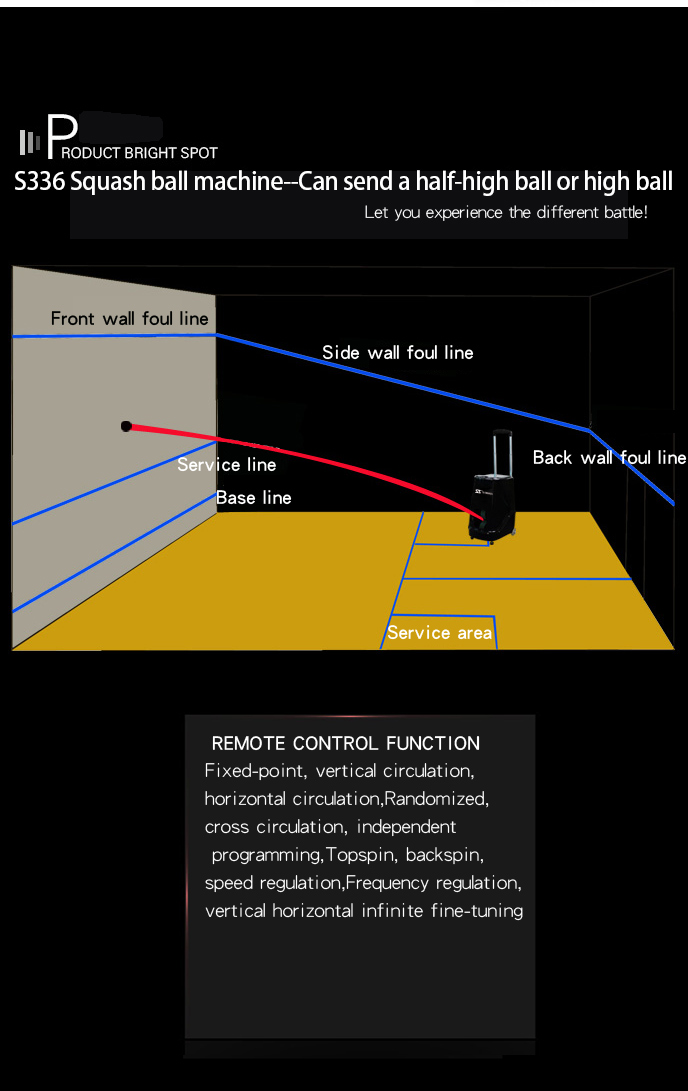
- Do NOT place the machine inside the service box (balls come too flat).
- Do NOT place it against the back wall (trajectory becomes unrealistic).
Height Adjustment: Set elevation angle to 15-20° for standard drives, 30-40° for lob drills, 5-10° for attacking shots. The S336A can shoot >7 meters — plenty for a full squash court. Start with medium power (level 5-6) and adjust based on where balls land.
Part 3: Warm-Up Setup for Solo Squash Training (First 10 Minutes)
Step 1: Turn On Heating — Always turn on auto-heating 10 minutes before your solo squash training session. Cold balls bounce dead, ruining your timing and muscle memory. The S336A reaches 45°C+ in ~10 minutes — optimal playing temperature.
Step 2: Fixed Spot — Cross-Court Drives — Mode: Fixed Spot, Direction: Backhand corner, Frequency: 5 sec/ball, Power: Level 4-5, Spin: none. Duration: 5 min (30-40 balls).
Step 3: Fixed Spot — Forehand Drives — Same settings, forehand corner, 5 minutes.
Part 4: 6 Proven Drills for Maximum Solo Squash Training Efficiency
Drill 1: Backhand Grooving for Solo Squash Training
Goal: Build unbreakable backhand consistency. Settings: Fixed Spot, backhand side, frequency 4 sec/ball → progressive, power level 5, topspin level 2→3→4. Hit 30 consecutive backhand drives; if miss, reset to zero. This is the foundation of any serious solo squash training routine.
Drill 2: Front-Back Movement (The Fitness Builder)
Settings: Vertical 2/3/5 Point Cycle, frequency 3 sec → 2.5 sec → 2 sec, power 5-6. Execution: deep drive → recover to T → drop shot → recover to T, 60 sec rounds. Perfect for solo squash training that builds endurance.
Drill 3: Lateral Coverage (The Court Sweeper)
Settings: Horizontal 3-Line, frequency 3 sec, backspin level 3. Machine feeds wide left → middle → wide right → middle → narrow. 2 min sets, 3-4 sets. This drill transforms your solo squash training into full-court coverage practice.
Drill 4: Pattern Recognition (The Tactical Builder)
Settings: Cross Fixed Mode, patterns 1→6, frequency 4 sec. The 6 patterns cover 90% of common match situations. Recognize pattern → execute correct response (drop→drive or drive→drop).
Drill 5: Match Simulation (The Pressure Test)
Settings: Horizontal/Full Court Random, frequency 4 sec → 2.5 sec, random spin. Play 11-point games against the machine. No predictable patterns — forces pure reaction. This is the ultimate solo squash training challenge.
Drill 6: Custom 35-Point Sequence (The Ultimate Drill)
Settings: Self-Programming mode, up to 35 points, 10 shots per point. Example: deep left (topspin3) → short right (backspin2) → middle drive (flat). Simulate any opponent’s style.
Part 5: Frequency and Power Guidelines for Solo Squash Training
| Skill Level | Frequency (sec/ball) | Power Level | Spin Level | 🎯 Recommended Drill for This Level |
|---|---|---|---|---|
| Beginner | 5-6 | 2-4 | 0-1 | Backhand Drive Groove (Fixed Spot) |
| Intermediate | 3-4 | 4-6 | 2-4 | Front-Back Movement (Vertical Cycle) |
| Advanced | 1.8-3 | 6-8 | 4-6 | Volley-to-Volley HIIT (Random Mode) |
| Pro | 1.8-2.5 | 8-9 | 5-6 | Tournament Simulation (Cross Fixed + Random) |
Part 6: Battery Management for Long Solo Squash Training Sessions
The 12V/32AH lithium battery provides 2-3 hours runtime. Light use (low power, no heating): ~3h; moderate: ~2.5h; heavy (max power + heating always on): ~2h. Pro tips: turn off heating after warm‑up, use AC when available, low battery alarm gives ~10 min warning.
Part 7: Common Setup Mistakes That Ruin Solo Squash Training
- Starting too fast – start at 5-6 sec/ball
- Ignoring heating – always turn on 10 min before
- Fixed spot only – spend 20% on random/cross modes
- Wrong court position – 2-3 feet behind service box line
- No progression plan – increase frequency/spin every 2-3 sessions
Part 8: Sample 60-Minute Solo Squash Training Session
| Time | Activity | Settings |
|---|---|---|
| 0:00-0:10 | Warm-up + heating | Fixed spot, both corners, 5 sec/ball, power 4 |
| 0:10-0:20 | Backhand grooving | Fixed spot, backhand side, 4 sec/ball, topspin 3 |
| 0:20-0:30 | Front-back movement | Vertical cycle, 3 sec/ball, power 5 |
| 0:30-0:40 | Lateral coverage | Horizontal 3-line, 3 sec/ball, backspin 3 |
| 0:40-0:50 | Pattern recognition | Cross fixed modes 1-6, 4 sec/ball |
| 0:50-1:00 | Match simulation | Random mode, 3 sec/ball, full court |
Part 9: Tracking Your Solo Squash Training Progress
Keep a simple training log like this example:
| Date | Drill | Setting | Success Metric | Result |
|---|---|---|---|---|
| 4/12 | Backhand | Fixed, 4 sec | 30 clean shots | 22/30 |
| 4/14 | Backhand | Fixed, 3.5 sec | 30 clean shots | 28/30 |
| 4/16 | Backhand | Fixed, 3 sec | 30 clean shots | 30/30 ✅ |
Progression rule: When you hit your target 3 sessions in a row, increase difficulty (reduce frequency or add spin).
Frequently Asked Questions About Solo Squash Training
Conclusion: Setup Right, Master Solo Squash Training Faster
A squash ball throwing machine is a powerful tool for solo squash training — but only if you set it up correctly. Use the guidelines above to position your machine properly, select the right mode, set appropriate frequency/power/spin, progress systematically, and track your results. The VEKEDA S336A gives you 35 programmable points, 12 shot modes, and 6 levels of topspin/backspin — enough variety to train every aspect of your game from basic grooving to advanced pattern recognition.
Your next step: Pick one drill from this guide. Set up your machine exactly as described. Run it for 15 minutes. Then add a second drill next session. Small improvements compound. In 4 weeks, your solo squash training will transform your game.
🏆 See full S336A specs →